Introduction
The Better-Bottle High-Flow Valve, Racking Adapter and Pail Adapter make up the first valve system that addresses the specialized needs of home winemakers and home brewers.
Now, it is possible to rack and bottle professionally without siphons or pumps. The components are made of durable, nonporous, hydrophobic PET that does not impart, or carry over, flavors and is easily cleaned and sanitized. The components can withstand continuous service at 100° C (212° F) and can be washed in a dishwasher.
Additional Information
Use the popup menu associated with the Valve/Adapters page random access to all the specific information relating to the Better-Bottle High-Flow valve, Racking Adapter, and Pail Adapter. Scrolling down this page will access the same information in sequential fashion. For materials specifications, please refer to the Technical page.
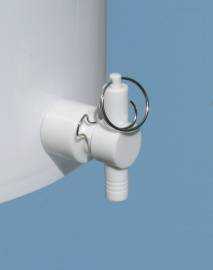
High-Flow™ Valve
Description
The Better-Bottle High-Flow valve can be used as an in-line valve for hoses or as an outlet for pails and Better-Bottle carboys. The valve is designed so it can be disassembled and reassembled for cleaning or inspection without tools in a matter of seconds, and its wide, simple flow path resists clogging. The valve opens and closes in the blink of an eye, but it can also be set to any position in between.


Operation
The High-Flow valve is opened fully by pulling on the wire ring until the plunger stops, and it closed fully by pushing down on the plunger until it stops. Rotating the plunger with the wire ring as the plunger is pulled or pushed makes fine adjustments of partial flows easier. The input side of the valve is designed to push into 1/2" ID soft plastic tubing and to mate in quick-disconnect fashion with the Better-Bottle Racking Adapter and Pail Adapters. The output side is designed to make connection with 1/2", 3/8", and 1/4" ID soft plastic tubing and rigid or semi-rigid 3/8" OD tubing. A 3/8" OD bottle filling tube will push into the output very nicely.Use the Carboys page to access. Suggestions for: Racking/Bottlingfor a detailed description about using the High-Flow valve for bottling.
 |
A) Soft 1/2" ID tubing pushes over the output port. B) Better-Bottle offers a semi-rigid Teflon adapter (b) that couples soft 3/8" ID tubing with the output port. C) Semi-rigid 3/8" OD tubing mates directly with the output port. D) Soft 1/4" ID X 3/8" OD tubing mates directly with the output port if a short length of rigid or semi-rigid tubing (d) is pressed into the ID of the soft tubing. |
Service
To disassemble the valve, rotate the wire ring through the hole in the end of the plunger shaft so that itunscrewsout of the hole. Then, push the plunger out the end of the valve body. To reassemble the valve, push the plunger into the valve body andscrewthe wire ring through the hole in the end of the plunger shaft. Start by inserting the end of the wire that is curled into the ring through the hole first.
It should not be necessary to remove the O-rings for cleaning and sanitation. If an O-ring requires replacement for any reason, do not use sharp tools to remove it; pin one side of the O-ring into its groove with a finger nail and use the other hand to rub the rest of the O-ring so that it bulges up in front of the pinch point and can be rolled out of the groove. Use only Better-Bottle O-rings for replacement.
Cleaning/Sanitizing
The special PET from which Better-Bottle High-Flow valves are made is non-porous and hydrophobic, making it extemely easy to clean and sanitize. Simply soak and rinse them in appropriate cleaning and sanitizing solutions with their plungers in a half open position to expose all of the surfaces. Rarely, will it be necessary to disassemble a valve for cleaning. Always rinse valves thoroughly in clean water before storing them. Better-Bottle is not aware of any detergents and sanitizers, used in home winemaking and beer brewing, that damage Better-Bottle carboys and fittings when used according to their manufacturer's instructions. Use theTechnical page for specific information about cleaning and sanitizing.
Abrasive scouring pads and cleansers should never be required, or used.
Racking Adapter
 Description
The Better-Bottle Racking Adapter couples the High-Flow valve to any ported Better-Bottle carboy, and the combination makes professional racking and bottling quick and easy.
Operation
The Racking Adapter uses a Teflon-encapsulated Viton O-ring to make an hydrophobic seal against the inside wall of a Better-Bottle carboy, eliminating crevices that could trap contamination. This very special O-ring also makes it possible to rotate the body of the Racking Adapter easily, without lubrication. Racking simply requires rotating the Adapter so the tip of its intake stem is just above the sediment layer, opening the High-Flow valve, and letting gravity go to work there is no need for siphons or pumps. The external pointer makes it possible to adjust the position of the stem even if the stem cannot be seen through a dark wine or beer.
The Racking Adapter is especially popular with winemakers and brewers who ferment on shelves, because carboys can be racked without having to move them to a surface with head room for racking canes. For more detailed information about the use of the Racking Adapter refer to the Suggestions for: Racking/Bottling.See the Carboys page to access this information.
Installation
Better-Bottle Racking Adapters have been designed so they are very easy to install and service. Be certain all of the component parts are installed in the correct order.

Racking Adapter (Sequence of Components)
Installation in 5- & 6-Gallon Carboys
A 50 cm (20") length of 1/4" diameter rod or 44 cm (18") 3/8" inside diameter (clearance) tube is needed to install Racking Adapters in 5 or 6 gallon Better-Bottle carboys. The following items will serve the purpose nicely and can be purchased from your Better-Bottle dealer or most hardware stores for about $2: A Better-Bottle installation tube; Nominal 3/8" Schd. 40 PVC pipe (0.675" OD x ~0.473" ID); Quarter inch steel (plated or stainless) rod; or 1/4"-20 steel (plated or stainless) running thread.
|
1. With the Teflon-encapsulated O-ring in place, use a tube or rod to slide the Racking Adapter body into the neck of a carboy. |
2. Guide the threaded portion of the Racking Adapter body into the hole in the side of the carboy. |
3. Hold the Racking Adapter body in place with the rod or tube and install the three Teflon slip washers; the pointer (if desired), frosted side away from the carboy; the locking O-ring; and the nut in that order. |
4. Finger tighten the nut, using just enough force so the Racking Adapter makes a good seal, but can be comfortably rotated by hand. Observe the position of the pointer with respect to the stem of the Racking Adapter. Loosen the nut and reposition the pointer, so it will line up with the stem when the nut is re-tightened. Re-tighten the nut. |
5. Slide out the tube or rod and double check that the Outlet assembly rotates smoothly, but with enough resistance to indicate a good seal. Adjust the tightness of the nut as required. |


Installation in 3-Gallon Carboys
A rod or tube is not needed to install an Racking Adapter in a 3 gallon Better-Bottle bottle, because the stem of the outlet will contact the bottom of the carboy and prevent the Adapter from rotating continuously in one direction.
- Drop the body of the Racking Adapter, with the Teflon-encapsulated O-ring in place, into the bottle and guide the threaded part of the body through the hole in the side of the bottle with a stiff piece of wire or something like a small screwdriver inserted through the hole from outside the bottle.
- Once the thread pokes through the hole, pull it all the way into the hole and install the three Teflon slip washers; the pointer (if desired), frosted side away from the carboy; the locking O-ring; and the nut in that order.
- Finger tighten the nut, using just enough force so the Racking Adapter makes a good seal, but can be comfortably rotated by hand. Observe the position of the pointer with respect to the stem of the Racking Adapter. Loosen the nut and reposition the pointer, so it will line up with the stem when the nut is re-tightened. Re-tighten the nut.
Cleaning/Sanitizing
The special PET from which Better-Bottle Racking Adapters are made is non-porous and hydrophobic, making it extremely easy to clean and sanitize. It is rarely necessary to remove a Racking Adapter from a carboy for cleaning and sanitizing, because there are no crevices to trap contamination. Running hot water backwards through an attached High-Flow valve is an excellent way to rinse out the valve, the Adapter, and the carboy. When soaking the interior of a carboy in a detergent solution or rinsing with a sanitizing solution, be certain to open the High-Flow valve long enough to ensure that some of the solution enters the Racking Adapter and valve. Always rinse Adapters and valves thoroughly in clean water before storing them. Better-Bottle is not aware of any detergents and sanitizers, used in home winemaking and beer brewing, that damage Better-Bottle carboys and fittings when used according to their manufacturer's instructions. Use theTechnicaltab at the top of this page for specifics.
Abrasive scouring pads and cleansers should never be required, or used.
 Pail Adapter
Description
The Better-Bottle Pail Adapter couples the High-Flow valve to any plastic pail, and the combination makes racking from a pail into a Better-Bottle carboy for secondary fermentation clean and simple.
Operation
The Pail Adapter uses a Viton O-ring to make a tight, static seal against the inside wall of a pail, eliminating crevices that could trap contamination. Racking simply requires opening the High-Flow valve, and letting gravity go to work there is no need for siphons or pumps. Usually, the Pail Adapter is installed so that a level pail will drain to just above the sediment layer. If some usable liquid remains above the sediment layer, the pail can be tipped slightly in order to recover the liquid. For more detailed information about the use of the Pail Adapter refer to theSuggestions for: Racking/Bottling. Click the image to the right or use theCarboys tab to the left of this page to access this information.
Installation
Better-Bottle Pail Adapters have been designed so they are very easy to install and service. Be certain all of the component parts are installed in the correct order.

(Sequence of Components)
 Most pails used for winemaking and brewing are made of HDPE and it is easy to make a 3/4" (2 cm) hole in their sides for a Better-Bottle Pail Adapter.
- A hole saw can be used to make a hole; however, a knockout punch can be more accurately positioned and will make a much cleaner hole. Refer to the figure to the right and decide where to position the center of the hole. The center must be at least 3/4" (2 cm) above the bottom of the pail (RED), to give the wall of a pail room to flex and seal with the Pail Adapter O-ring. The depth of liquid left in a pail when it is level and drained through Pail Adapter and High-Flow valve will be 1/8" (0.3 cm) below the center of the hole in the pail (BLUE). If the center of the hole in the pail is 3/4" above the bottom of the pail, the residual liquid will be 5/8" (1.6 cm) deep, which is an excellent depth for most wine kits started in 30 liter pails. If the center of the hole in the pail is 1" (2.5 cm) above the bottom of the pail, the residual liquid will be 7/8" (2.2 cm) deep. Make the measurement for the center of the hole from the inside of a pail and press a sharp pointed tool through the wall to locate the center from the outside, because the bottoms of pails vary in thickness and the extent to which they are recessed.
- Insert the threaded portion of the Pail Adapter body into the hole in the side of the pail.
- Hold the body in place with one hand and with the other install the Teflon slip washer, locking O-ring; and the nut in that order.
- Finger tighten the nut, using just enough force so the Pail Adapter makes a good seal.
Cleaning/Sanitizing
The special PET from which Better-Bottle Pail Adapters are made is non-porous and hydrophobic, making it extremely easy to clean and sanitize. It is rarely necessary to remove a Better-Bottle Pail Adapter for cleaning and sanitizing, because there are no crevices to trap contamination. Running hot water backwards through an attached High-Flow valve is an excellent way to rinse out the valve and Adapter. When soaking a pail with a detergent solution or rinsing with a sanitizing solution, be certain to open the High-Flow valve long enough to ensure that some of the solution enters the Pail Adapter and valve. Always rinse Adapters and valves thoroughly in clean water before storing them.Better-Bottle is not aware of any detergents and sanitizers, used in home winemaking and beer brewing, that damage Better-Bottle carboys and fittings when used according to their manufacturer's instructions. Use theTechnicaltab at the top of this page for specifics.
Abrasive scouring pads and cleansers should never be required, or used.
Part Numbers
High-Flow™ Valve BB-VALVE(HF)
Racking Adapter Only supplied with Racking Better-Bottle Carboys BB-ADAPT(RK)
- Tool for installing Racking Adapter in 5 & 6 gallon Better-Bottle carboys BB-ADAPT(RK)-IT
- Replacement set of O-rings, Teflon slip washers, and pointer for Racking Adapter BB-ADAPT(RK)-SERV
Pail Adapter™ BB-ADAPT(PL) - Replacement set of O-rings, and Teflon slip washer for Pail Adapter BB-ADAPT(PL)-SERV
Harmonized System Code 3923.30.90.90 applies to these parts